

What is Auto Tagging?
Auto Tagging puts tags on your contacts for you, based on rules you set once. For example:- Agents who sent you more than 10 inspections this year get the tag top producer
- Agents who haven’t booked in 6 months get the tag inactive
- Clients who booked more than once get the tag repeat client
How it works
- You give a tag a rule, like “more than 10 inspections in the last 365 days”.
- Every night, Hive checks each agent (or client) against that rule.
- Contacts who match get the tag. Contacts who don’t: nothing changes, unless Remove Tag on Rule Fail is on, in which case the tag comes off.
Set up an auto tag
- Go to Contacts and click Manage Tags.
- Click Add New Tag, or click the ✏️ pencil on an existing tag.
- Give the tag a name, like top producer.
- Turn on Auto Tagging.
- Under Auto Tag Person, choose Agent or Client.
- Fill in the rule: a Rule Type, a Condition and a number.
- Click Save Tag (or Save Changes when editing).
- A preview shows who will get the tag. Click Apply now, or Wait for tonight.
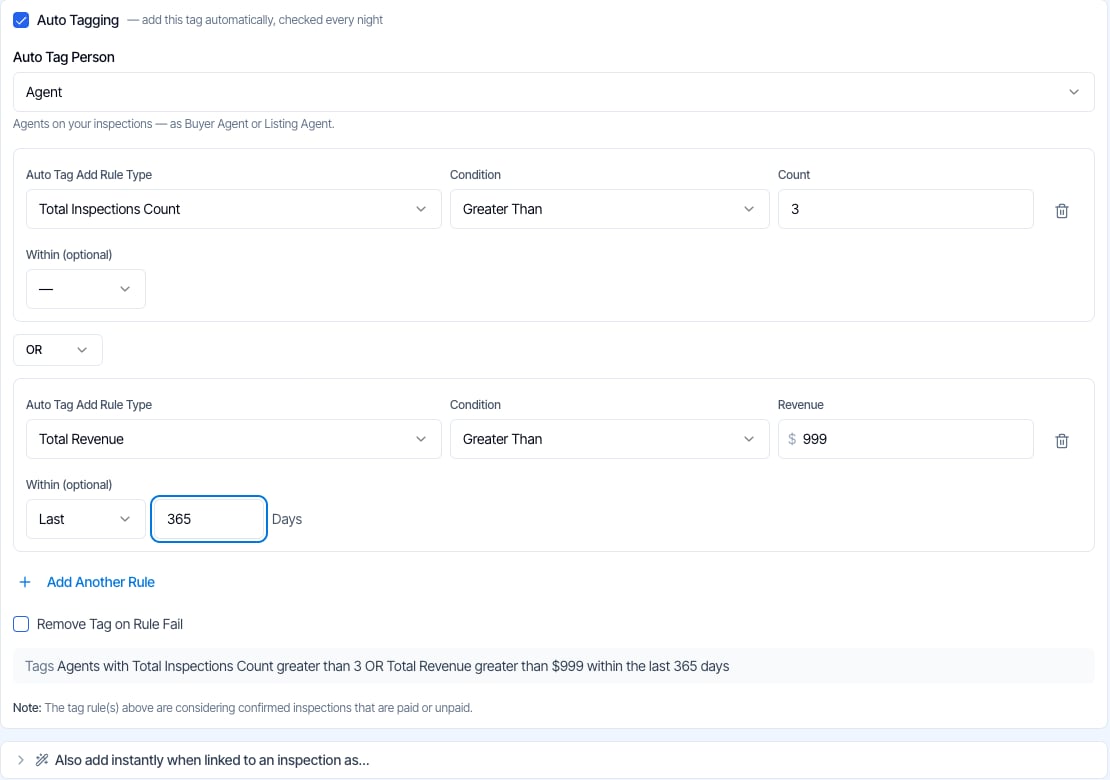
An auto tag for agents with more than 3 inspections, or more than $999 in revenue in the last 365 days.
Popular auto tags to copy
Start with one of these and adjust the numbers to your business.
Turn Remove Tag on Rule Fail on for tags that describe a current state (inactive, heating up, new agent), so the tag comes off when the contact no longer fits. Leave it off for tags people should keep (top producer, repeat client). More on this below.
Choosing your rules
Every rule has the same parts, in the same order as on screen:Rule Type · Condition · Number · Within (optional)For example: Total Inspections Count · Greater Than · 10 · Within Last 365 Days means “more than 10 inspections in the last 365 days”.
Auto Tag Person: who gets tagged
Pick the kind of contact the tag is for. Hive checks each of those contacts against their own inspection history.A contact is only checked once they’re on at least one confirmed inspection as that type. Someone in your contacts who has never been on an inspection is never auto-tagged.
Rule Type: what gets measured
Agents only: each rule type also comes in a Buyer Agent and a Listing Agent version, like Buyer Agent Inspection Count or Listing Agent Revenue. Use these when only one side of the deal matters to you.
Condition
Within (optional)
For Inspections Count and Revenue rules, you can limit the rule to a time frame:
First Inspection and Last Inspection rules don’t have a time frame. The number you enter is already in days.
Combining rules: AND / OR
Click Add Another Rule to add more. Between each pair of rules, choose AND or OR:- AND: the contact must match both rules.
- OR: the contact must match either rule.
Preview before anything changes
Whenever you save new or changed rules with Auto Tagging on, Hive shows a preview before touching any contact:- Will be tagged: contacts who match and don’t have the tag yet
- Will lose the tag: only when Remove Tag on Rule Fail is on
- Tagged now: everyone who has the tag today
- Match the rules: how many of your agents or clients match
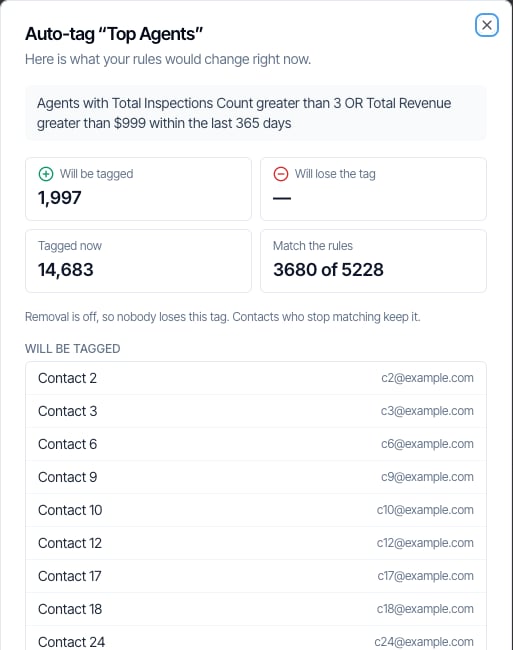
The preview lists who will be tagged before anything changes.
Changed your mind? Undo it
Click Undo right after applying. Or, on the tags list, click the tag’s 🕘 history button and Undo the latest run. Every contact goes back exactly the way they were.Undo reverses one run. The rule itself stays on, so it runs again that night. To stop it, turn Auto Tagging off or change the rule. To delete the rules from a tag entirely, turn Auto Tagging off and click Clear saved rules.
Remove Tag on Rule Fail
By default, Auto Tagging only adds tags. Once a contact has the tag, they keep it. Turn on Remove Tag on Rule Fail when the tag should always reflect the rule right now. For example, inactive or heating up should come off when the contact no longer fits.Built-in safety net: if one night’s check would remove the tag from more than half of the contacts who have it (and more than 100 contacts), Hive holds those removals and marks the tag Removals held — review. Click the tag’s ▶ Preview & apply button to see the list and apply it yourself.
Use auto tags in your automations
Tags added by Auto Tagging work like any other tag. When you set up an automated email or text, use the Contact Tag Filter:- Contains any of: send only to contacts who have one of the tags
- Does not contain any of: send only to contacts who don’t have any of the tags
- Send a thank-you email to agents tagged top producer
- Leave agents tagged inactive out of your agent emails
- Send clients tagged repeat client a “welcome back” email instead of your first-time client email
Timing matters. Automations check tags when a message is first scheduled (for example, when the inspection is booked), and again right before it sends.
- A tag removed before the send stops a message that hasn’t gone out yet.
- A tag added after the message was scheduled won’t bring back a message that was already skipped.
Auto Tagging vs. “Also add instantly”
Below Auto Tagging, each tag has a second, simpler option called Also add instantly when linked to an inspection as… The two do different jobs:
You can use one, the other, or both on the same tag.
Good to know
- Only confirmed inspections count, paid or unpaid. Cancelled, deleted and sample inspections are ignored.
- Revenue is the total price of the counted inspections.
- Days are counted in your organization’s time zone (the one in Org Settings). “Last 90 Days” means the 90 calendar days ending today, and “days ago” means calendar days, not 24-hour periods.
- Each inspection counts once per contact, even if they’re on it twice (for example as both Buyer Agent and Listing Agent).
- “Equal To 0” with no time frame never tags anyone, because a contact is only checked once they have at least one confirmed inspection. With a time frame it works: Total Inspections Count · Equal To · 0 · Within Last 90 Days finds agents who booked before but not in the last 90 days.
- Tag names keep your capitalization. “VIP Agent” stays “VIP Agent”.
- The tags list shows each tag’s last run and what changed (for example “Last run Sep 30 · +12 / −3”).
Frequently asked questions
When does Auto Tagging run?
When does Auto Tagging run?
Every night. Each tag with Auto Tagging turned on is checked once overnight, using each contact’s inspections at that moment. If you don’t want to wait, click Apply now in the preview after you save the tag.
I saved a rule but nobody got tagged. Why?
I saved a rule but nobody got tagged. Why?
Check these in order:
- Is Auto Tagging turned on for the tag?
- Has the nightly run happened yet? Use the Preview & apply button (▶) on the tag to apply it now.
- Does anyone actually match? The preview shows Match the rules: X of Y. If X is 0, loosen the rule.
- Are you using Equal To 0 with no time frame? A contact only counts once they have at least one confirmed inspection, so “equal to 0” over all time never matches anyone. Add a time frame (for example Last 90 Days) to find contacts who have gone quiet.
Which inspections count?
Which inspections count?
Only confirmed inspections, paid or unpaid. Cancelled, deleted and sample inspections are ignored. If a contact is on the same inspection twice (for example as both Buyer Agent and Listing Agent), it counts once.
Where does the revenue number come from?
Where does the revenue number come from?
Revenue is the total price of each counted inspection, added up.
I applied a rule by mistake. Can I undo it?
I applied a rule by mistake. Can I undo it?
Yes. Click Undo right after applying, or open the tag’s history (🕘) and click Undo on the latest run. Everyone goes back exactly the way they were. Remember to change or turn off the rule too, or it will run again that night.
Can I auto-tag lenders, title companies or other contact types?
Can I auto-tag lenders, title companies or other contact types?
Not yet. Auto Tag Person covers Agents (Buyer Agent and Listing Agent) and Clients. For other contact types, use Also add instantly when linked to an inspection as… on the same tag. It adds the tag the moment that contact is added to an inspection.
Why does my tag keep its capital letters?
Why does my tag keep its capital letters?
Hive keeps tag names exactly as you type them. Tag names are still unique regardless of case, so you can’t have both “VIP Agent” and “vip agent”.
Does adding a tag send any emails or texts?
Does adding a tag send any emails or texts?
No. A tag on its own never sends anything. It only changes which automated messages a contact receives, if you use the Contact Tag Filter on an automation.
Next step
Related