

In the dashboard: Business Tools → Custom Fields
Custom fields are your own questions, added to every inspection. Hive already asks for the property address, client, agents, square footage and year built. A custom field covers anything else you want to know, for example:- the client’s current address, for your agreement or invoice
- the number of units in a multi-family building
- a gate or lockbox code
- the property’s ZIP code, to charge more in some areas
- will the client attend the inspection?
- On the New Inspection page, where your team fills it in while scheduling.
- On your online scheduler, where your clients can answer it when they book. You choose which questions they see and which ones they must answer.
- In the mobile app, where inspectors can see and update it on site.
- set the price with a custom field modifier, such as $150 for each extra unit or $25 more in some ZIP codes
- print it in emails, text messages, agreements and reports with a placeholder, such as
{{{custom_gate_or_lockbox_code}}} - choose which automations send, for example a utilities reminder only for vacant homes
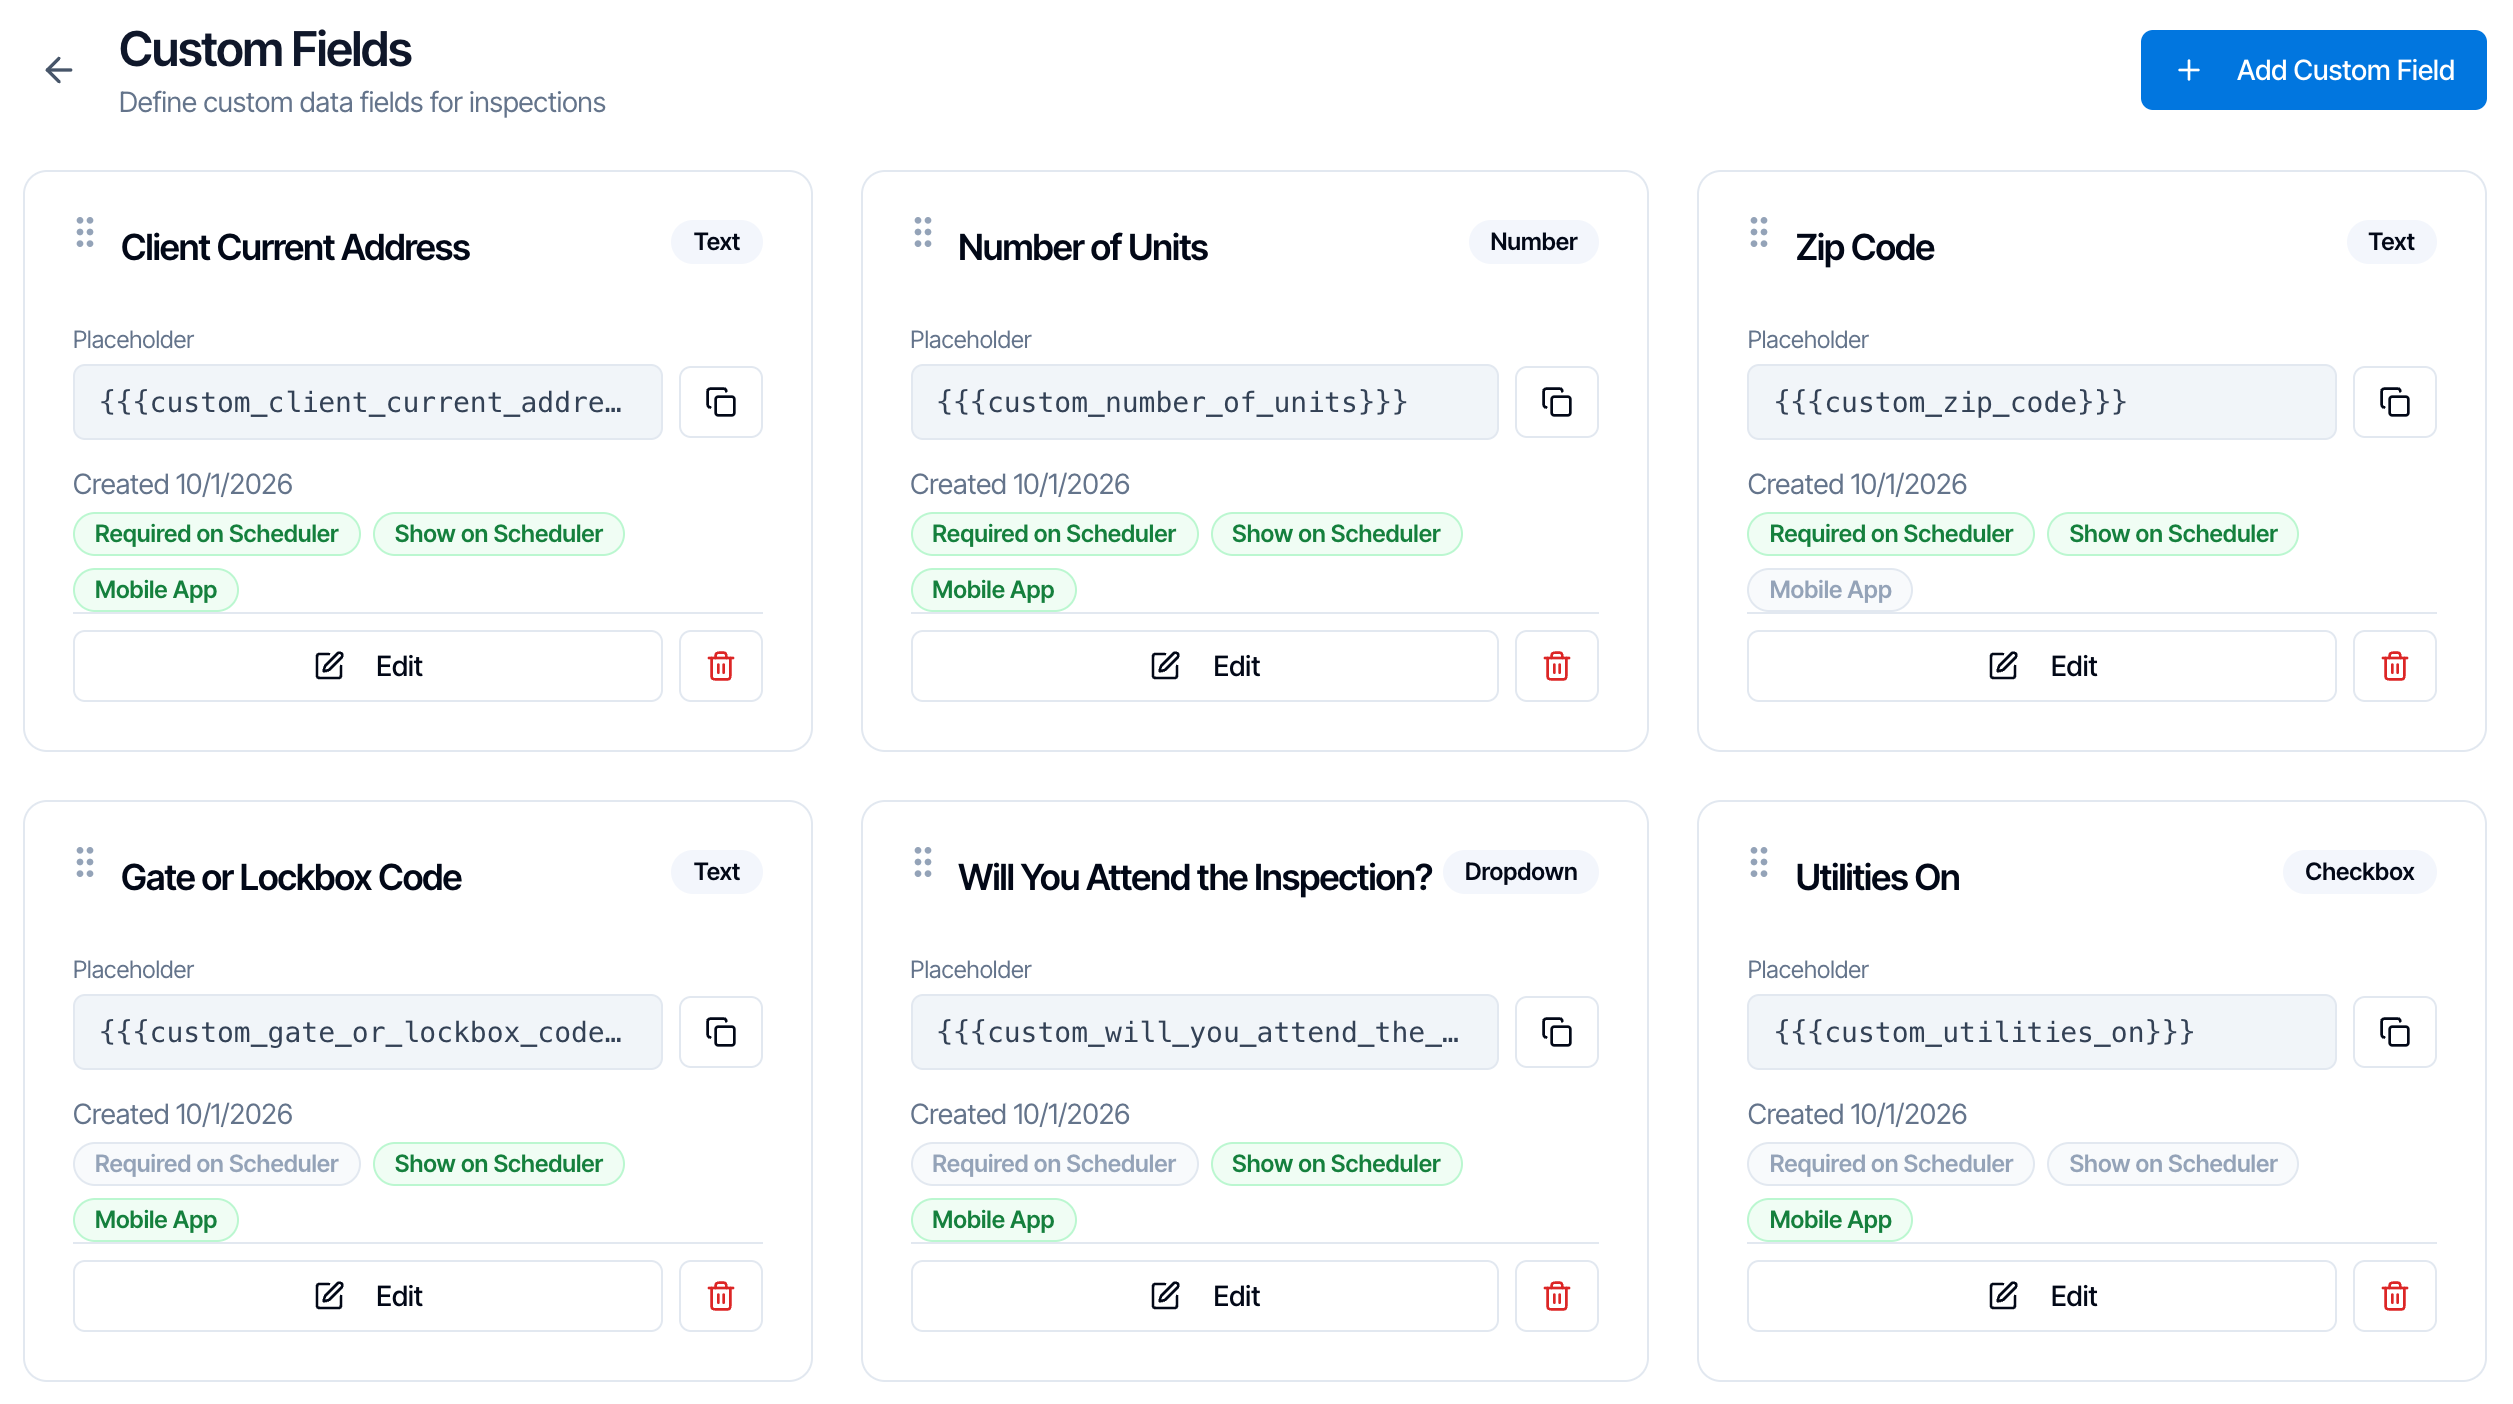
Add a custom field
Open Custom Fields
In the dashboard, click Business Tools in the sidebar, then Custom Fields, then Add Custom Field.
Name the field
Type the question as you want your team and clients to see it, such as Client Current Address or Will You Attend the Inspection?. A name can be up to 50 characters, and two fields can’t have the same name.As you type, Hive shows the field’s placeholder, such as
{{{custom_client_current_address}}}. You use it to print the answer in emails, agreements and reports. See Print answers in emails, agreements and reports.Pick the Field Type
For a Dropdown, type each option and press Enter. Click the x on an option to remove it.
Choose where the question is asked
Your team always sees every custom field on the New Inspection page in the dashboard, whatever these settings are.
- Text field
- Dropdown field
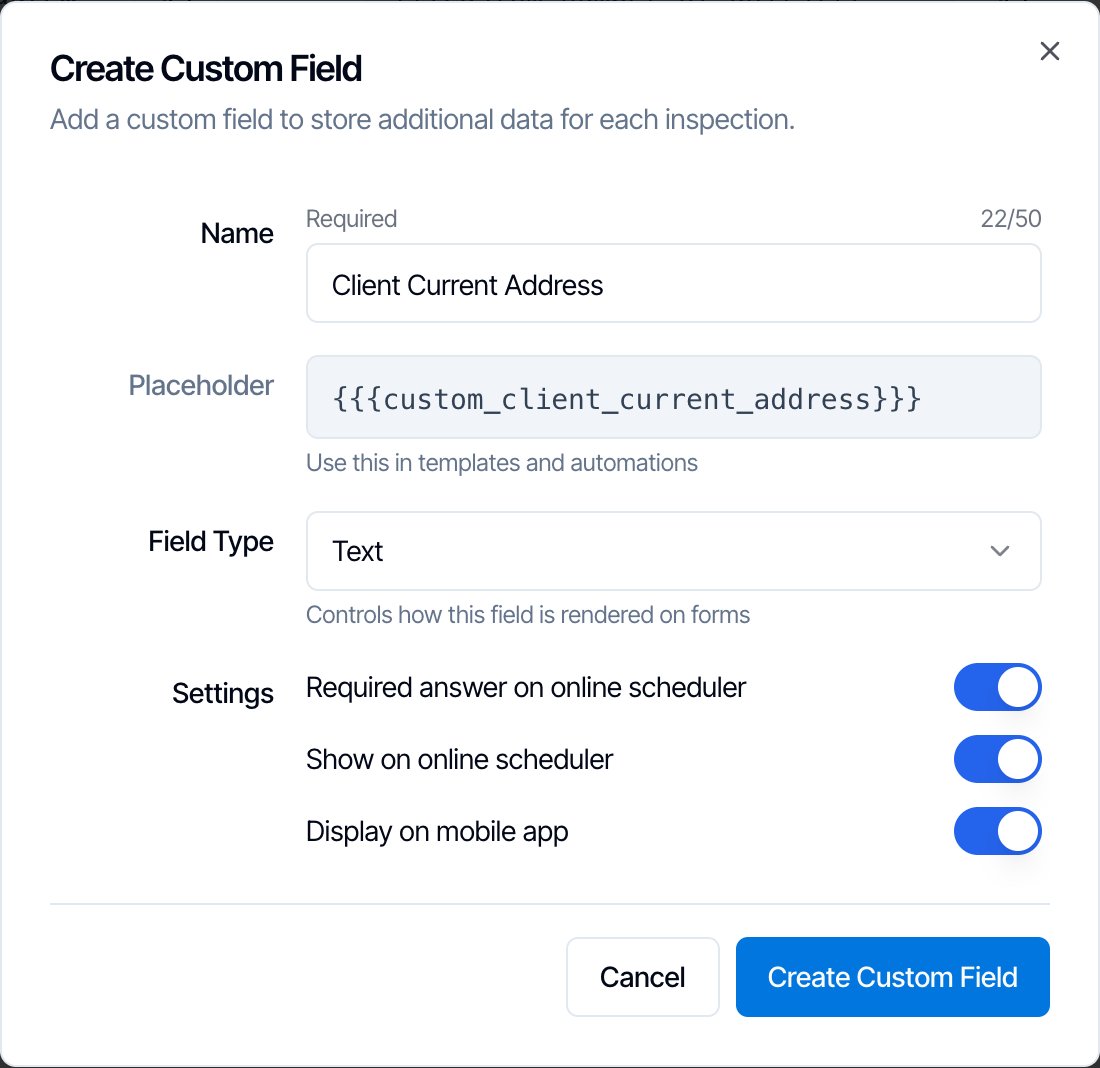
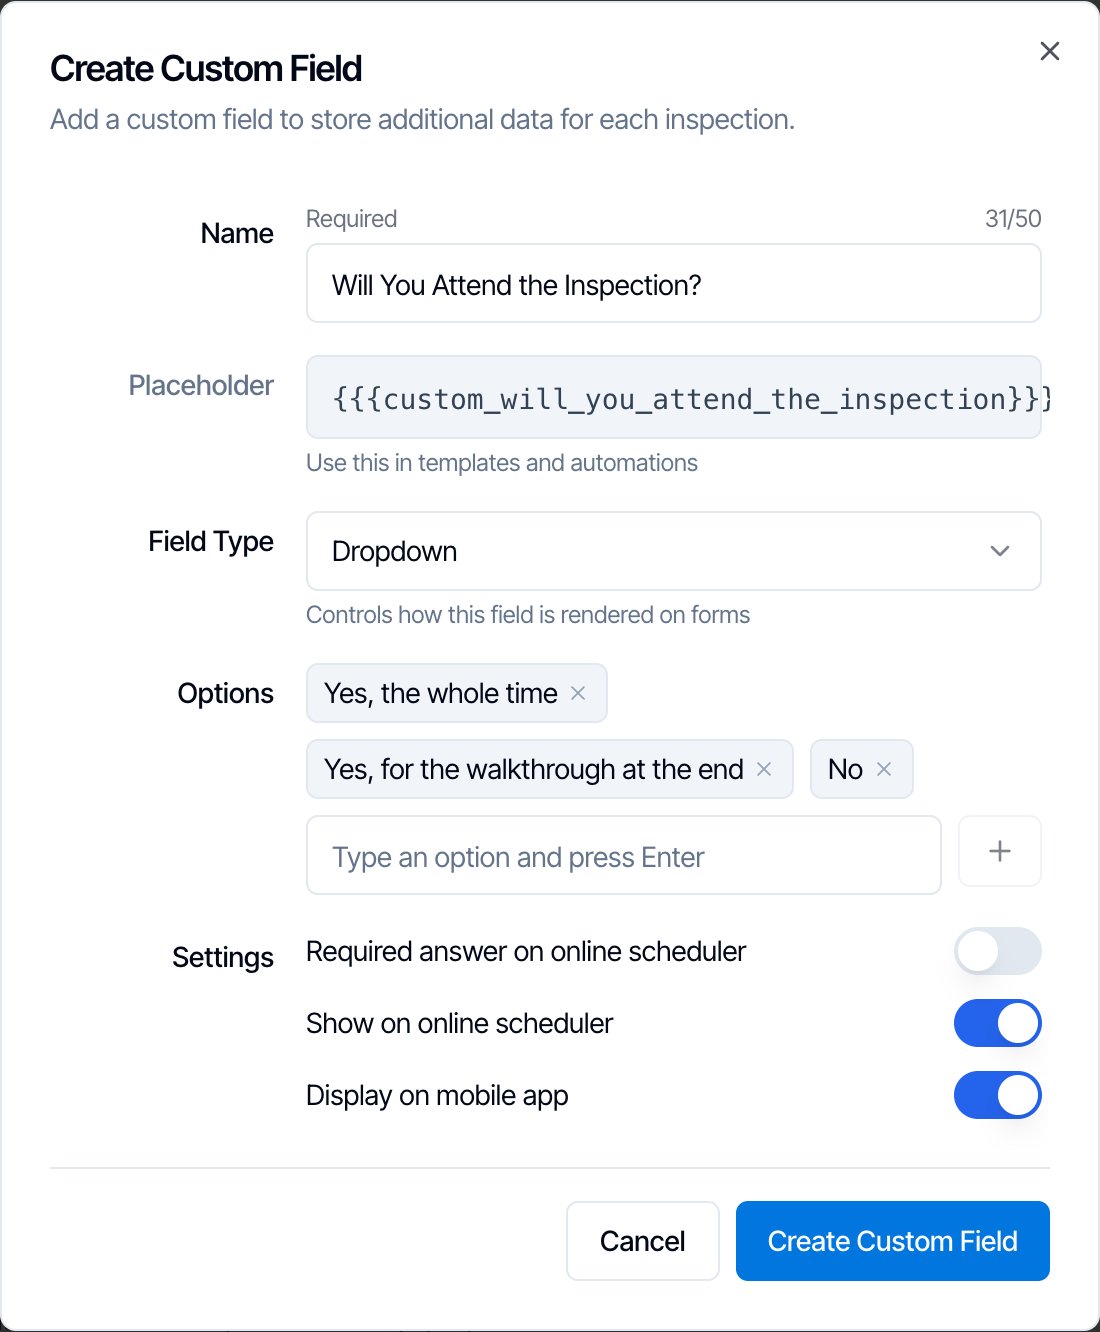
Questions Hive inspectors ask with custom fields
These are the most common kinds of custom fields across inspection companies on Hive. Use them as a starting point.Some things already have a place in Hive, so you don’t need a custom field for them:
- Card numbers or payment details: never collect these in a custom field. Answers are stored as plain text and can be printed in emails. Take payments with online payments instead.
- How the client heard about you: use Referral Sources.
- Paying at closing: use Pay at Close.
- Property Type, Square Footage, Year Built, Bedrooms, Bathrooms, Property Occupancy and Foundation Type: the online scheduler already asks these. Square footage, year built and foundation already work with price modifiers. To charge by bedrooms or property type, you do need a custom field. See Charge more or less based on the answer.
Fill in answers when you schedule
When your team books an inspection in the dashboard (New Inspection in the sidebar, which opens Create New Inspection), every custom field is in the Custom Fields card. It’s after the contacts and before Service Selection.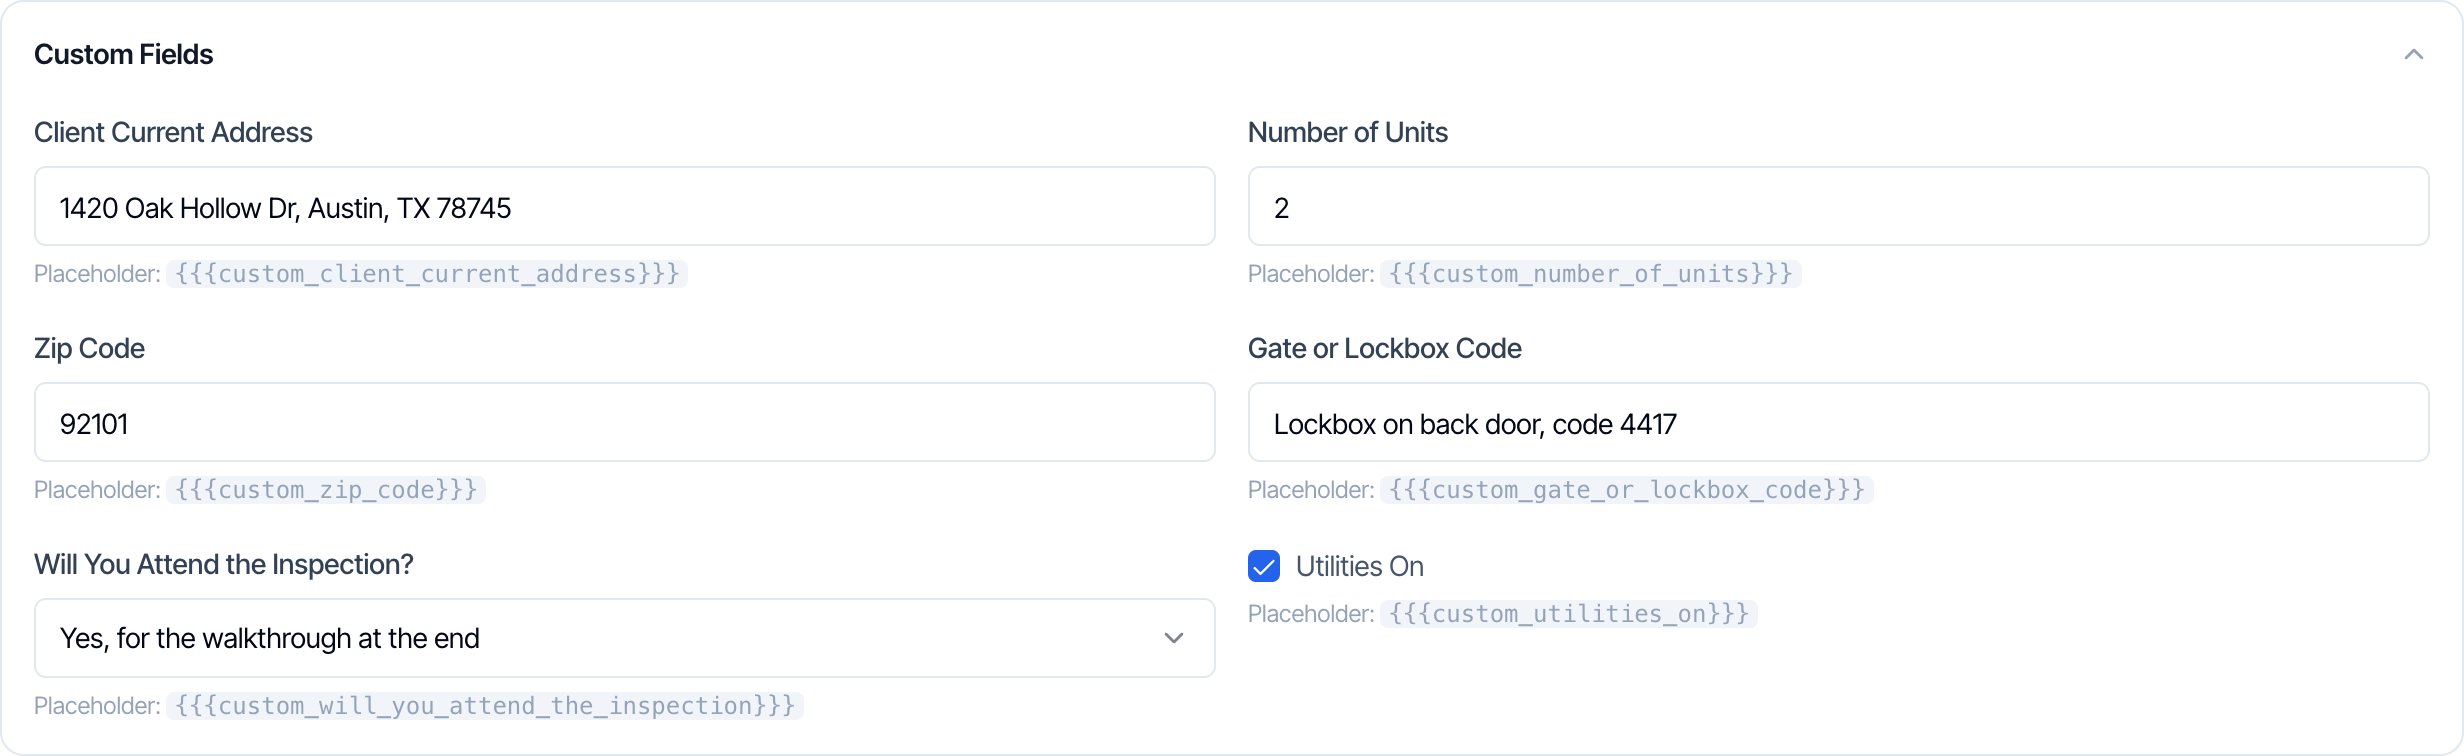
- Text and Number fields are boxes to type in.
- A Dropdown has your options plus None, which clears the answer.
- A Checkbox is ticked or not.
- The small grey text under each field is its placeholder.
Change an answer later
Open the inspection’s Inspection Order Page and change the answer in the same Custom Fields card. It saves on its own.- Before the inspection is confirmed, changing an answer updates the price.
- Once it’s confirmed, changing an answer never changes the price. To change the price, use Edit Price or Duration.
- Emails already sent and agreements already signed keep the old answer. The digital report shows the new answer the next time it’s opened.
Let clients answer on the online scheduler
Fields with Show on online scheduler turned on appear on your online scheduler under Additional Information, on step 3, Property Details, after the client picks the address. They’re in the same order as your Custom Fields page.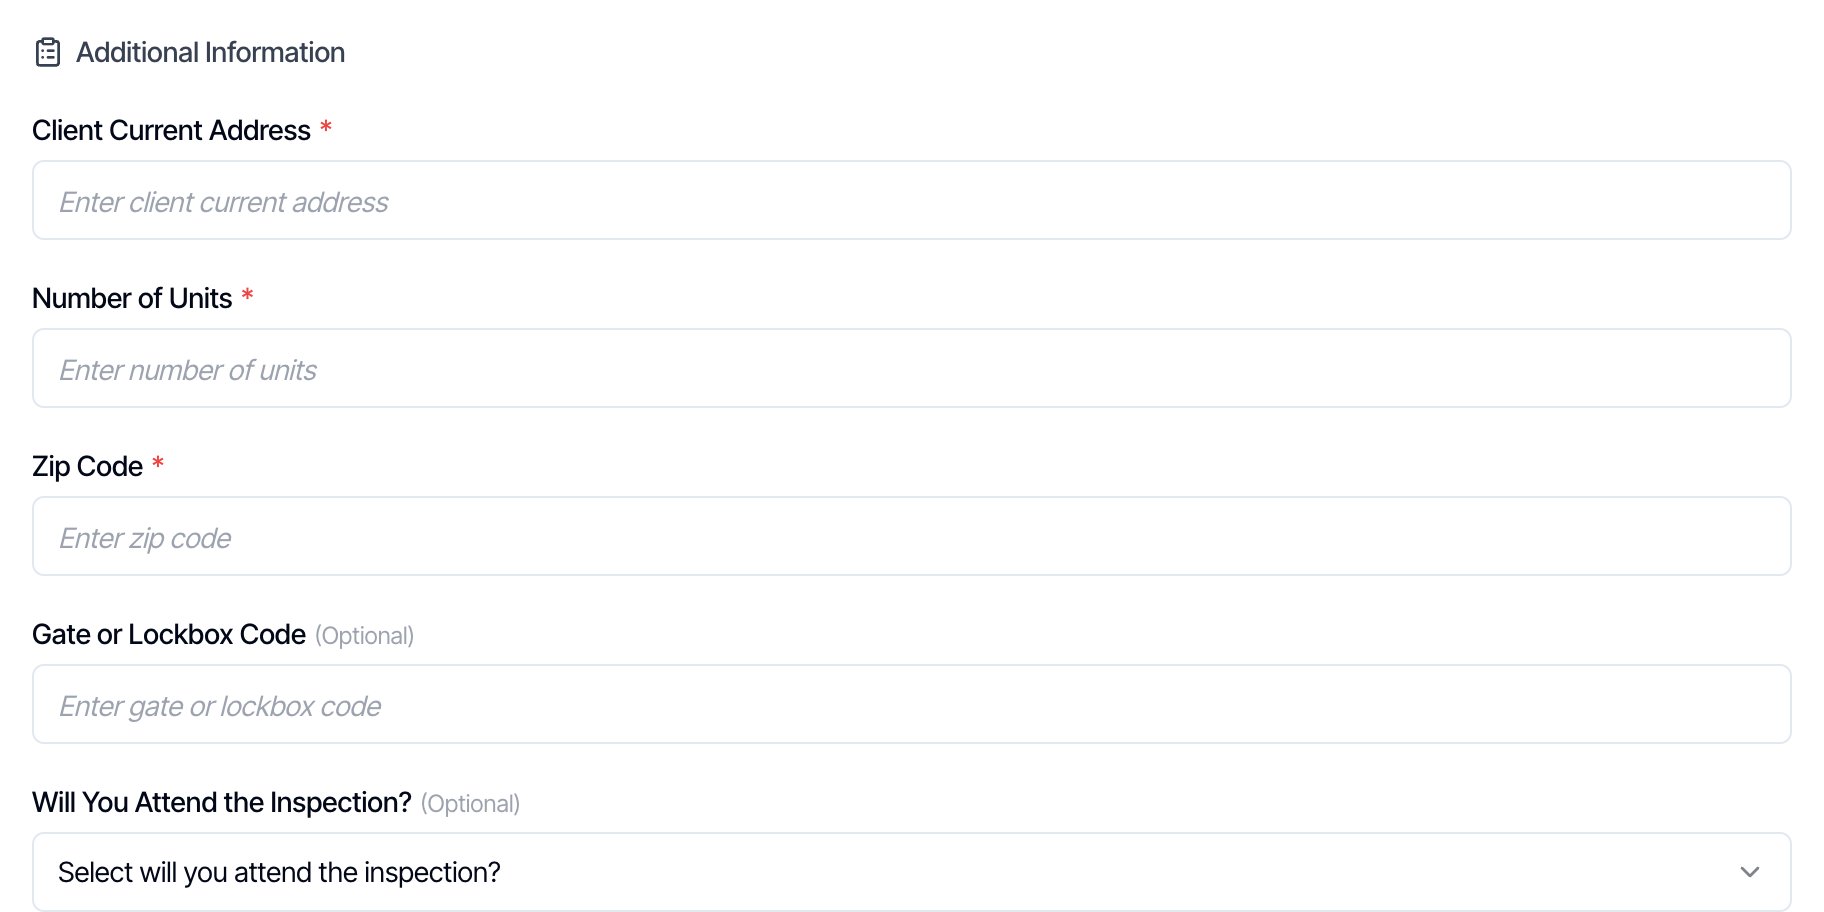
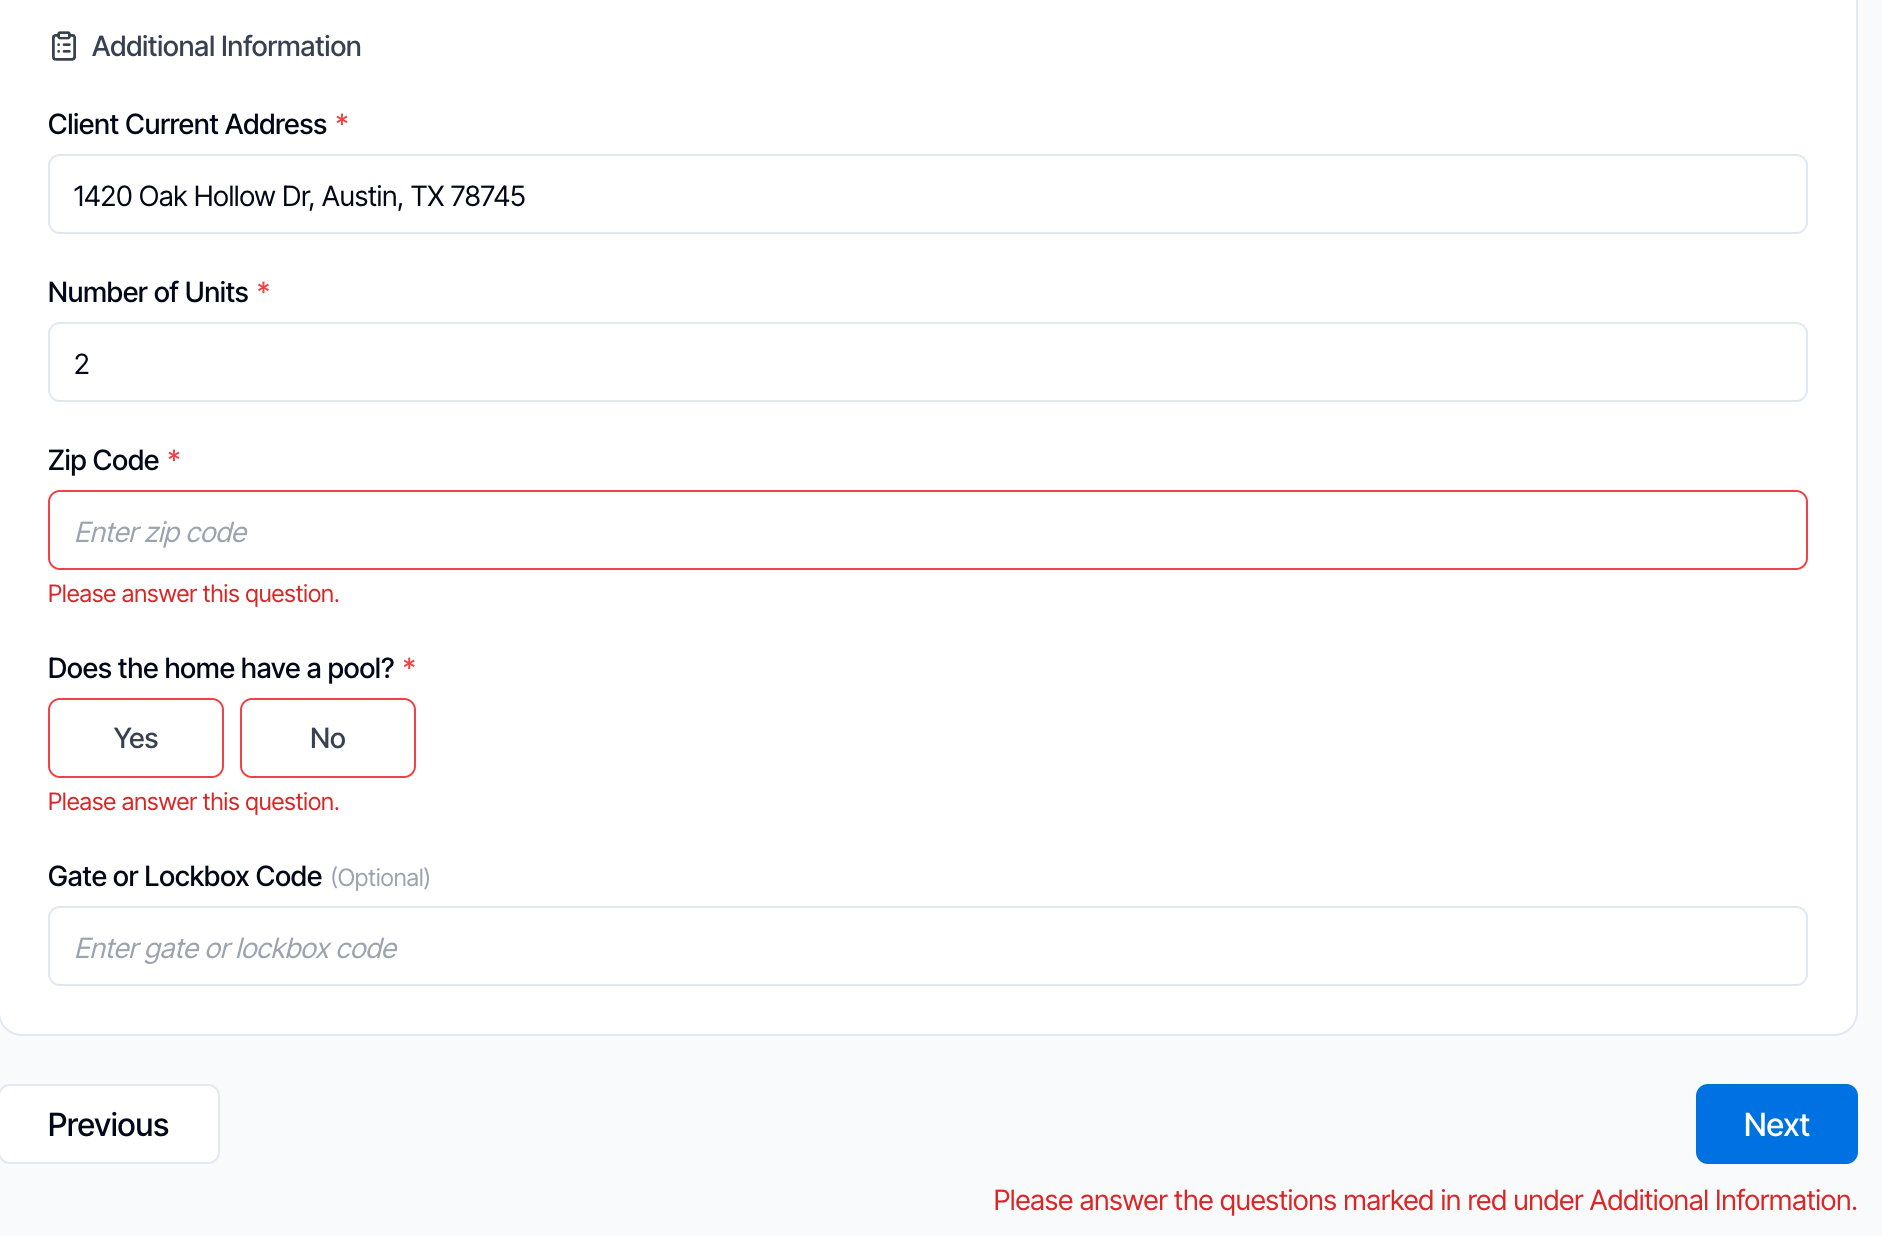
- A question with Required answer on online scheduler has a red star. All the others say (Optional). If the client clicks Next without answering one, it’s outlined in red with “Please answer this question.” See Make a field required.
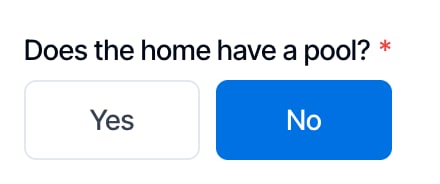
- A checkbox field is a box to tick. If it’s required, the client picks Yes or No instead.
- Your quote widget asks the same questions on its first step. When the client clicks Ready to Schedule?, their answers are already filled in on the scheduler.
- The prices the client sees already include their answers. When they book, Hive works out the price again from the answers and saves them on the inspection.
Answer in the mobile app
Fields with Display on mobile app turned on are in the Custom Fields card (“Organization-specific data fields”) on the inspection in the mobile app, just above the timeline.- Tap a field to change it. Text and number fields have a Save button, dropdowns open a list with None at the top, and checkboxes are a switch that saves as soon as you flip it.
- A field with no answer shows a dash (-). Press and hold an answer to copy it, such as a lockbox code.
- Saving needs an internet connection. If it fails, you see “Error Updating Inspection” and the old answer comes back.
- Answers changed in the app don’t change the price of a booked inspection.
Make a field required
There is one way to make a custom field required: turn on Required answer on online scheduler. It works on the online scheduler and the quote widget, for your clients.
If the client clicks Next with a required question unanswered, they stay on the step. Each unanswered question is outlined in red with Please answer this question., the page scrolls to the first one, and a note next to Next says “Please answer the questions marked in red under Additional Information.” Each message goes away as soon as that question is answered.
- Turn on both settings. Required answer on online scheduler does nothing on its own. If Show on online scheduler is off, clients never see the question, so they can’t be asked to answer it. On the Custom Fields page, check that the card has both Required on Scheduler and Show on Scheduler in green.
- What counts as an answer. Spaces alone don’t count, and None in a dropdown counts as no answer.
-
A required checkbox is asked as Yes or No. Clients see Yes and No buttons and must pick one. No is a valid answer, so a home without a pool can still be booked. The answer is saved like a tick: Yes is checked and No is not checked, so your automation filters, placeholders and the mobile app work the same. A checkbox that isn’t required stays a box to tick.
- A required question can’t make the client agree to something. Because No counts as an answer, don’t use a required checkbox for terms the client must accept. Put those in your agreement.
- For your own team, use a reminder. Fields can’t be required in the dashboard or the app. To make sure a question gets answered, set up an automation to the inspector or your office, such as a reminder the day before, with the Custom Field Filter “Gate or Lockbox Code Is empty”. It only sends when the answer is still missing.
Charge more or less based on the answer
Once a custom field exists, you can add a modifier on it to any service or add-on. The modifier adds a fee, or takes one off, and can add time, based on the answer.
Go to Business Tools → Services & Fees, edit the service, and click Add Modifier. Your custom fields are at the bottom of the When list, under Custom Fields. Custom field modifiers explains every type step by step.
Example: mark up inspections by ZIP code
Many inspectors charge more for ZIP codes that take longer to reach. Hive has no built-in ZIP code price, so you do it with a custom field.Create the Zip Code field
In Business Tools → Custom Fields, add a field named Zip Code, with Field Type Text. Turn on Show on online scheduler and Required answer on online scheduler, so every online booking has a ZIP code.
Add one modifier for each ZIP code that costs more
Edit the service in Business Tools → Services & Fees and click Add Modifier. Set When to Zip Code. Type is Equals To. Type the ZIP code in Expected Value, the extra amount in Add Fees, and any extra time in Add Hours.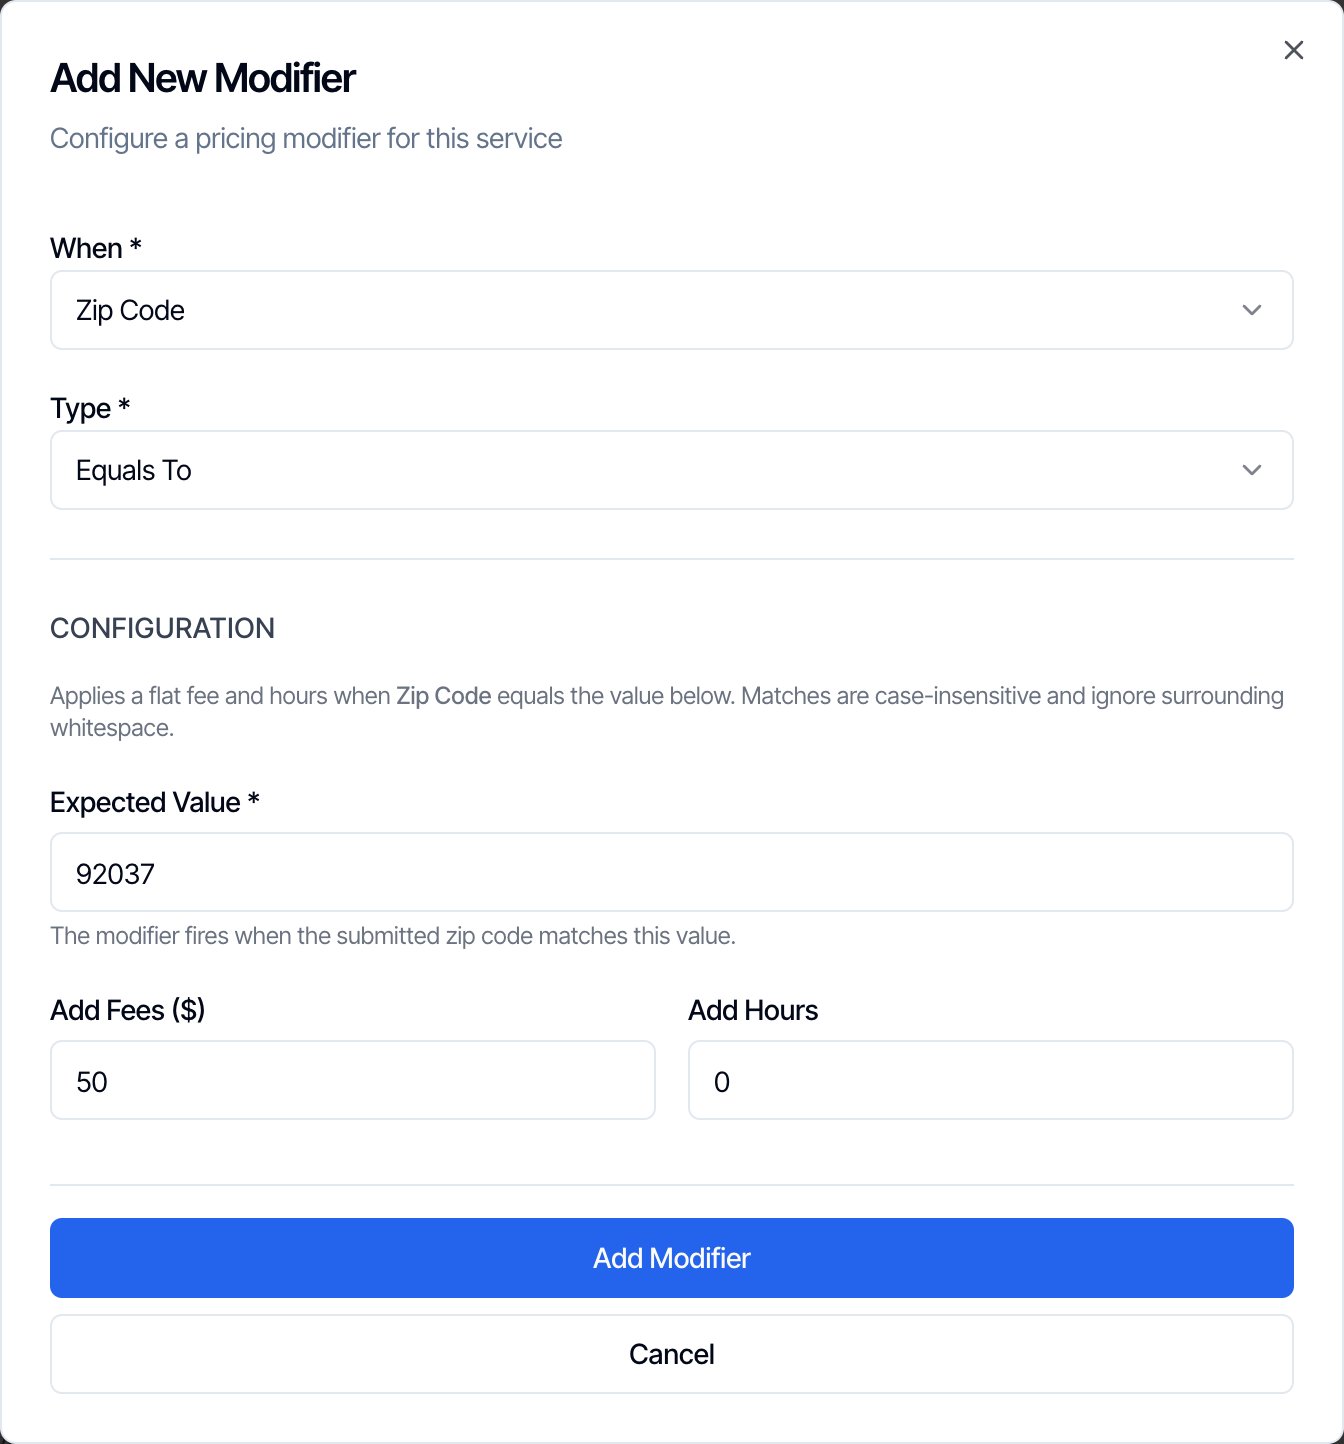
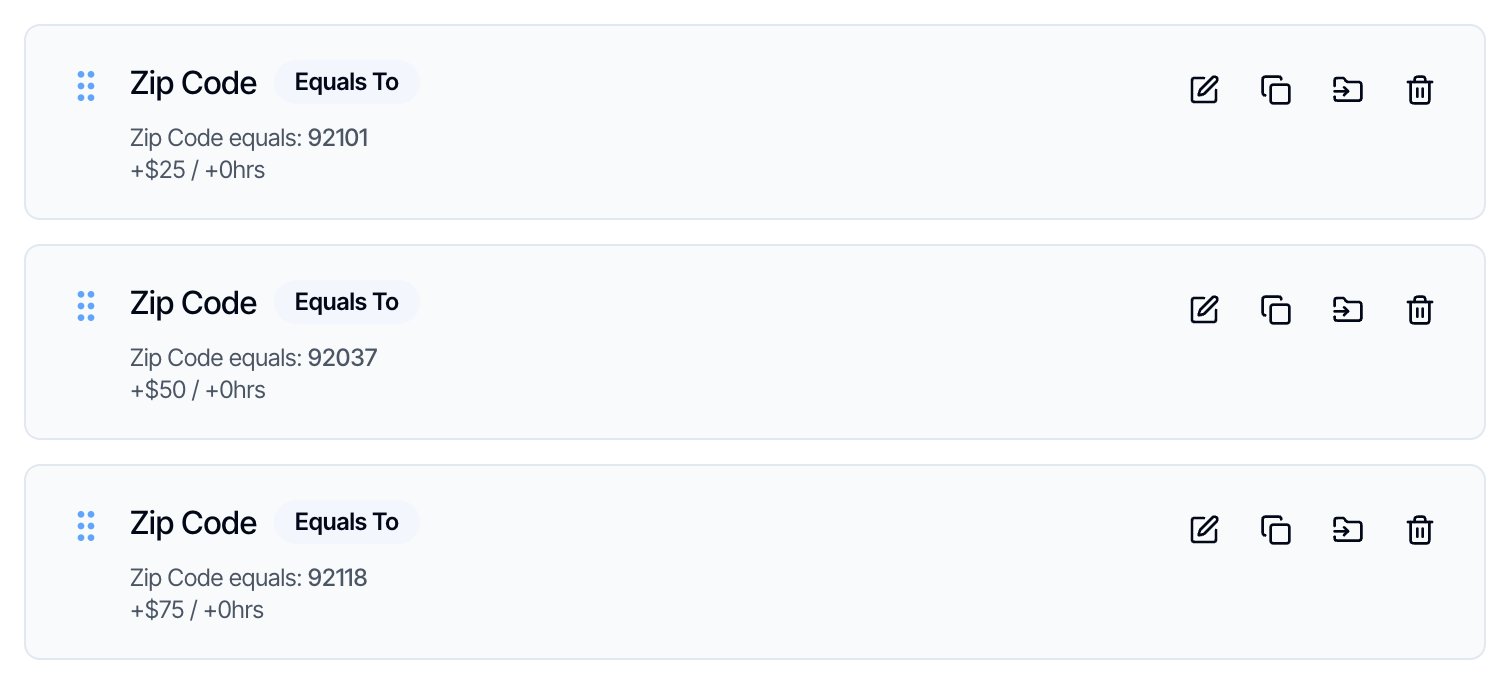
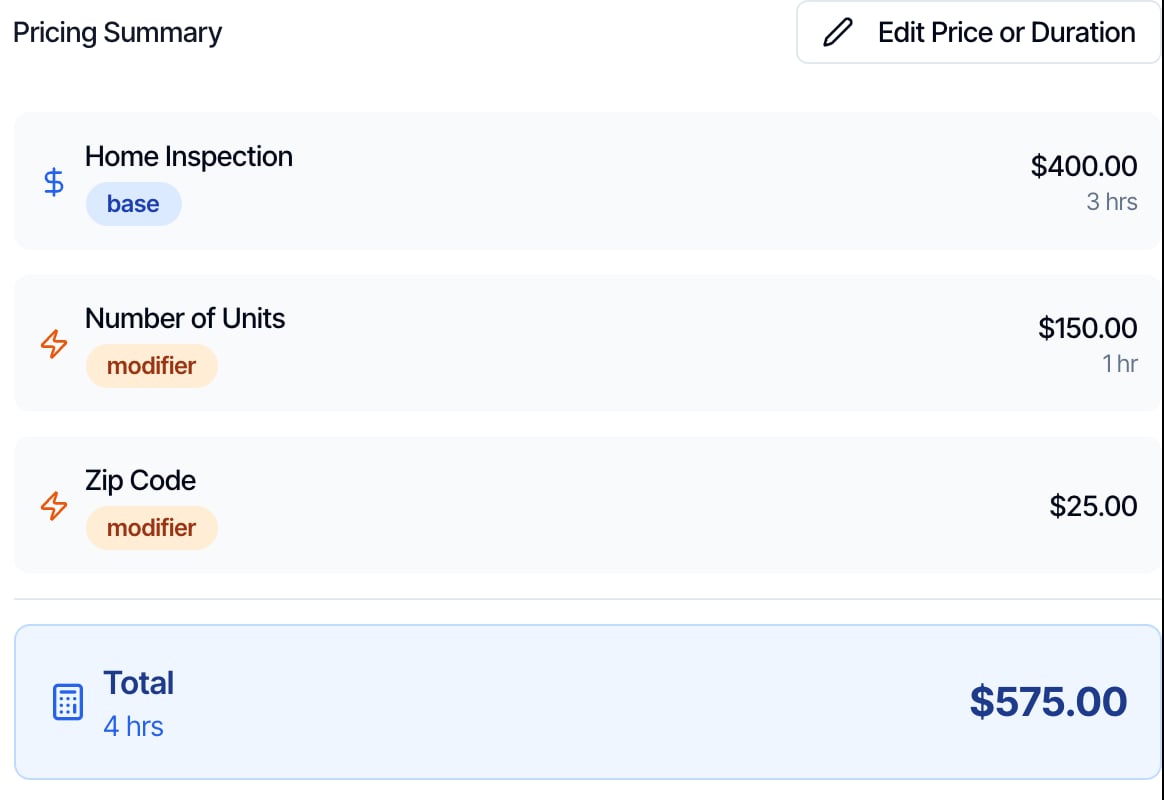
- The ZIP code is asked separately. Hive doesn’t copy the ZIP code from the property address into your Zip Code field, so the client types it again under Additional Information. Making the field required makes sure it’s never skipped.
- The answer must match exactly. Spaces and capital letters don’t matter, but
92101-4502doesn’t match92101. Clients usually type five digits. - ZIP codes with no modifier cost the normal price.
- Lots of ZIP codes? Group them instead. Create a Dropdown field such as Service Area, with options like Zone 1, Zone 2 and Zone 3, and add one modifier for each zone. Or charge by driving distance with a distance modifier, which needs no extra question.
Example: charge for extra units
- Create a Number of Units field, Number, with Show on online scheduler and Required answer on online scheduler turned on.
- Add a modifier on it: Type Per Unit Over, Starting After 1, Add Fees 150, Add Hours 1.
Print answers in emails, agreements and reports
Every field has a placeholder:{{{custom_ and the field name in lowercase, with underscores for spaces and symbols, and three braces on each side. Client Current Address becomes {{{custom_client_current_address}}}. Click the copy button on the field’s card to copy it.
Put the placeholder anywhere Hive fills in placeholders. Hive replaces it with that inspection’s answer:
What gets printed:
- No answer: the placeholder disappears, so nothing is printed.
- Checkbox: prints
trueorfalse. For a yes-or-no answer that reads well in an email, use a Dropdown with Yes and No. - Dropdown: prints the option exactly as you wrote it.
Send automations based on the answer
In an automation’s advanced settings, Custom Field Filters send a message only when the answers match, for example:- a utilities reminder only when Is the home occupied? is No
- a crawlspace note to the inspector only when Foundation Type is Crawlspace
- a note to the office when Number of Units is greater than 4
Rename, reorder or delete a field
- Rename: click Edit on the field’s card. The placeholder stays the same, so your emails, agreements, templates, automation filters and price modifiers keep working. You can also change the field type, the dropdown options and the three settings here.
- Reorder: drag a card by its handle. The new order shows on the New Inspection page, the online scheduler and the mobile app.
- Delete: click the red trash icon. The field disappears from the dashboard, the online scheduler and the app. Answers already saved on inspections are kept. If price modifiers use the field, the dialog lists them, and they stop applying. Remove the placeholder from your emails, agreements and templates too, or it prints nothing on new inspections.
Frequently asked questions
Can I make a custom field required for my team when scheduling?
Can I make a custom field required for my team when scheduling?
No. Required answer on online scheduler only applies to clients on your online scheduler and quote widget. Your team can always save an inspection without answering. To catch missing answers, set up an automation with the Custom Field Filter Is empty. See Make a field required.
I turned on Required answer on online scheduler, but clients can skip the question. Why?
I turned on Required answer on online scheduler, but clients can skip the question. Why?
Show on online scheduler is probably off, so the question never appears. Edit the field and turn on both. The card should show Required on Scheduler and Show on Scheduler in green.
Why does my checkbox show Yes and No buttons on the scheduler?
Why does my checkbox show Yes and No buttons on the scheduler?
Because it’s required. A single box can’t tell “No” apart from “not answered yet”, so a required checkbox asks the client to pick Yes or No. Yes is saved as checked and No as not checked. To show a plain box to tick, turn off Required answer on online scheduler.
How do I charge more for some ZIP codes?
How do I charge more for some ZIP codes?
Create a Zip Code custom field (Text, shown and required on the online scheduler), then add one Equals To modifier for each ZIP code to your services. See Example: mark up inspections by ZIP code.
Does the Zip Code field fill in from the property address?
Does the Zip Code field fill in from the property address?
No. Custom fields are never filled in on their own. The client, or your team, types the ZIP code into the field.
Do custom fields appear in the client's report?
Do custom fields appear in the client's report?
Only where you put the placeholder. A field you use only for tracking, like a lockbox code, stays private unless you add it to report text.
Can I change an answer after the inspection is published?
Can I change an answer after the inspection is published?
Yes. Change it on the inspection. The digital report shows the new answer the next time it opens. The PDF keeps the old answer until it’s made again, which happens after your next edit to the report. Emails already sent and agreements already signed don’t change.
Does changing an answer change the price?
Does changing an answer change the price?
Only before the inspection is confirmed. After that, the price stays as booked. Use Edit Price or Duration to change it.
Can I show a custom field on the calendar event?
Can I show a custom field on the calendar event?
Yes, in the description. Go to Business Tools → Calendar Description and add the field from Available fields, so a lockbox code or permit number is right on the inspector’s calendar. The fields you pick replace the standard description. Event titles can’t be changed; they always show the address.
Can I show a custom field only to my team?
Can I show a custom field only to my team?
Yes. Turn off Show on online scheduler, so clients never see it. Turn off Display on mobile app too if inspectors don’t need it. It’s then only on the dashboard’s New Inspection page.
Why does my checkbox print true or false?
Why does my checkbox print true or false?
That’s how a checkbox answer is saved. To print Yes or No, change the field to a Dropdown with those two options.
Can I collect card details in a custom field?
Can I collect card details in a custom field?
No, please don’t. Custom field answers are stored as plain text and can show up in emails. Take payments with online payments.